
You finally have your metal building up. Maybe it’s a workshop, a garage, or extra storage space. But the first summer rolls around and it turns into an oven. The first winter? An icebox. You start wondering if you did something wrong. You didn’t. You just haven’t insulated yet. If you want to know how to insulate a metal building the right way, you are in the right place. Let’s walk through it together.
Why Insulation Makes Such a Difference in a Metal Building
Metal conducts temperature extremely well. That means without insulation, whatever is happening outside, you feel it inside. Heat pours in during summer. Cold seeps through every panel in winter. Energy bills go up. Tools rust. Products get damaged. Work becomes uncomfortable.
The good news is that insulation fixes all of that. A properly insulated metal building stays at a stable temperature, reduces moisture buildup, cuts energy costs, and even dampens outside noise. These are real, everyday benefits you will notice right away.
Energy savings from proper insulation in metal structures can reach up to 30% on heating and cooling costs. That adds up fast, especially if you use your building year-round.
So whether you are running power tools or just storing equipment, insulation is the single upgrade that makes your metal building actually work for you.
Choosing the Right Insulation Type Before You Start
Not all insulation works the same way in metal buildings. Each type has its place depending on your climate, budget, and how you plan to use the space. Here is what you need to know before you buy anything.
Fiberglass Batt Insulation
This is the most common option. Fiberglass batts come in pre-cut panels that fit between wall framing and roof purlins. They are affordable, widely available, and easy to install without professional help. The main limitation is that they need a vapor barrier to control moisture in humid climates.
Spray Foam Insulation
Spray foam expands to fill every gap and crack, which makes it one of the most effective options for air sealing. It handles condensation well and bonds directly to metal. The downside is cost. Spray foam typically runs two to three times more than fiberglass, and professional application is usually recommended.
Rigid Foam Board
Foam board panels offer solid thermal resistance and work well on walls and under roof panels. They hold up against moisture and are easy to cut to size. Many builders use them in combination with other insulation types to improve overall performance.
Reflective or Radiant Barrier Insulation
This type works by reflecting radiant heat rather than absorbing it. It performs best when installed with an adjacent air gap and is especially effective in hot climates where sun exposure is intense.
Reflective insulation is often installed under the roof panels and can make a noticeable difference in summer temperatures inside the building.
Lstiburek and Carmody (1994) note in Moisture Control Handbook that vapor control strategies are essential in metal building assemblies because the steel shell creates a very different thermal boundary than wood-framed construction. Choosing the wrong insulation without accounting for moisture movement can lead to condensation problems inside the wall cavity.
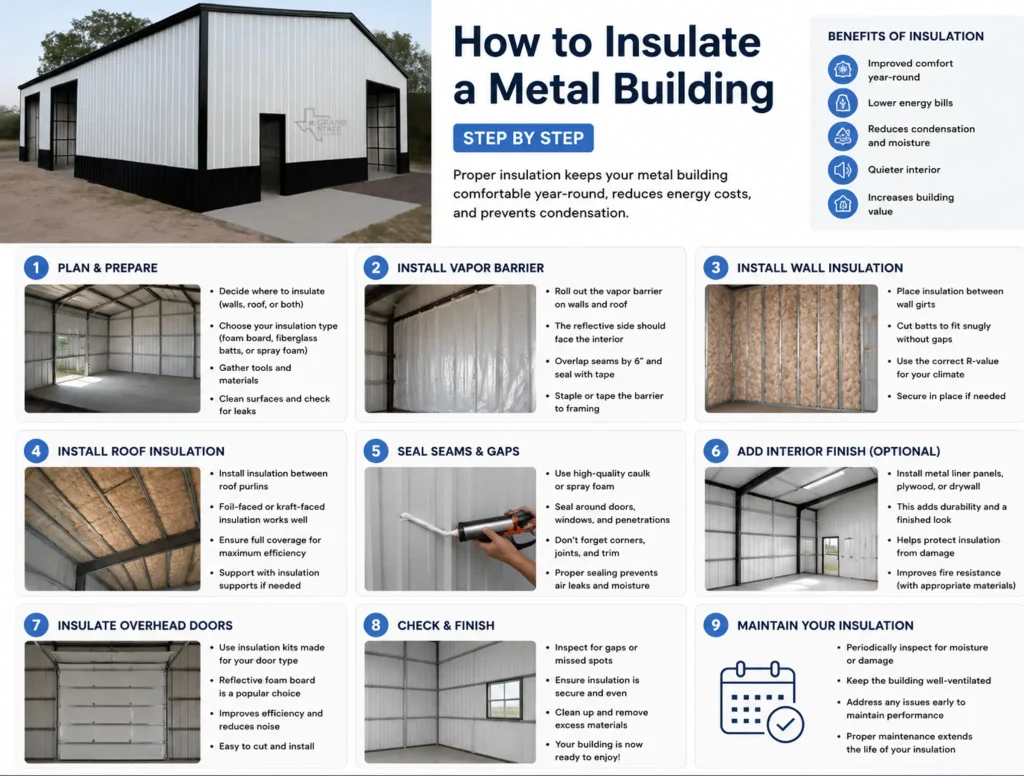
How to Insulate a Metal Building: Step by Step
Now let’s get into the actual process. These steps apply to most standard metal buildings, whether you are working on a new structure or retrofitting an existing one.
Step 1: Measure Your Building and Calculate R-Value Needs
Start by measuring the square footage of your walls, roof, and floor. Then check the recommended R-values for your climate zone. R-value measures how well insulation resists heat flow. A higher R-value means better performance. In most of the southern United States, you will want at least R-13 for walls and R-19 to R-30 for the roof.
Step 2: Address Condensation and Vapor Barriers
Metal and moisture are a bad combination. Before any insulation goes in, plan your vapor barrier. In warm, humid climates, the barrier goes on the exterior side of the insulation. In cold climates, it belongs on the interior side. Getting this wrong leads to rust, mold, and insulation failure. Take your time here.
Step 3: Install Roof Insulation First
Start at the top. Run your insulation across the roof purlins before the metal roof panels go on, or install it from the inside if the roof is already in place. Fiberglass batts work well here when laid between purlins. Spray foam is ideal when applied to the underside of the roof deck for maximum air sealing.
Step 4: Insulate the Walls
Wall installation follows the same principle. Fit batts between girts or apply spray foam directly to the metal panels. If you are using rigid foam board, attach it to the framing before installing any interior wall finish. Seal all edges to prevent air gaps.
Step 5: Don’t Forget the Floor
Many people skip the floor and regret it. A concrete slab without insulation beneath it becomes a heat sink in summer and freezes your feet in winter. If you are pouring a new slab, install rigid foam board underneath before the concrete goes in. For existing floors, insulated subfloor panels are a practical option.
Step 6: Seal All Gaps and Penetrations
Insulation is only as good as your air sealing. Every electrical outlet, conduit, pipe, door frame, and window opening is a potential air leak. Use spray foam or caulk to seal every penetration. This step takes extra time but it is where a lot of the real energy savings come from.
Step 7: Install Interior Finish if Needed
Once insulation is in place, you can finish the interior walls with metal liner panels, drywall, or plywood. This protects the insulation and gives your building a cleaner look. It also adds a second layer of protection against moisture and damage.
Common Mistakes to Avoid When Insulating a Metal Building
Even with the right materials, a few common errors can undermine your results. Watch out for these:
- Skipping the vapor barrier. This is the most frequent mistake, and it leads to condensation, rust, and insulation degradation over time.
- Choosing insulation by price alone. Cheap batts with low R-values will not perform well in extreme temperatures. Match the R-value to your actual climate.
- Leaving gaps at transitions. The junction between wall and roof is a common spot for air leaks. Seal it carefully.
- Ignoring doors and windows. These openings lose more heat and cool air per square foot than any other part of the building. Use foam backer rod and weatherstripping.
- Not accounting for future use. If you plan to heat or cool the space eventually, insulate to that standard now. Retrofitting later costs significantly more.
If you are still in the planning stage of your building project, it helps to start with the right structure. Learn more about what makes a well-built metal building on our Grand State Metal Buildings blog.
References
Lstiburek, J., & Carmody, J. (1994). Moisture control handbook: Principles and practices for residential and small commercial buildings. Van Nostrand Reinhold.
Metal Building Manufacturers Association. (2012). Low-rise building systems manual (10th ed.). MBMA.
U.S. Department of Energy. (2023). Insulation. Office of Energy Efficiency & Renewable Energy. https://www.energy.gov/energysaver/insulation